Sunday, December 15, 2013

10 Steps to Build a DIY Greenhouse at Home


Built correctly, a greenhouse can offer a wonderful haven for your plants where you can enjoy growing all manner of plants to your heart’s content.

However, get it wrong and you’ll have a disaster on your hands, not to mention all the money you wasted on the construction.
  • The good news is that you don’t have to spend a huge amount of money on a greenhouse.
  • You can build one yourself for a reasonable price and just a few hours of labor on your part.


If you’re ready to gather your supplies and get to work, here are 10 helpful steps you can use to build your own DIY greenhouse at home.


Step #1 – Consider Your Climate and Choose a Design

Before you even get started on your DIY greenhouse, your first step should be considering your climate and choosing the design of your greenhouse.

A design that works well in a humid, tropical climate may not work well in a cooler climate that experiences cold wind and snowy winters. 
  1. Your climate will affect the level of protection your greenhouse needs, which is important for controlling the inside environment of your greenhouse.
  2. Consider the climate problems you are facing and choose a greenhouse design that will help you to overcome these problems. For example, if you live in a humid, tropical climate, venting and bug protection is important. 
  3. In cold temperate climates, keeping plants warm during the cold winters is important.
  4. Bug netting can keep out bugs and extra thick plastic can help keep plants warm.
  5. Spend some time researching your climate and the best greenhouse construction for your climate and your growing needs.
 

Step #2 – Gather Materials

The next step to take is to gather the materials needed to construct your DIY greenhouse.

If you don’t have all the materials, you may need to purchase them. However, you may be able to freecycle, recycle and scrounge up some of the supplies to help save some money.

While every greenhouse will vary, here is a look at some of the common materials needed for a simple greenhouse design.

  1. PVC plumbing pipe (schedule 40 works well)
  2. Steel fence posts or re-bar, 8ft
  3. Clear plastic sheeting – thickness can vary, depending on climate
  4. 2x4x16 – cut into 2x2s
  5. 1x6x8’ pt to rip into 1x3s
  6. 2x4 studs
  7. 1x4x12’pt
  8. Staples
  9. Drywall Screws
  10. Nylon wire ties


Step #3 – Start By Constructing the Ends

Once you have all your supplies on hand, then you’re ready to start the construction process.

  1. You’ll want to begin by constructing the ends of your greenhouse.
  2. The end frames need to be sturdy or your entire greenhouse will be weak.
  3. It’s easy to begin the ends in a garage or other work area.
  4. Decide on height of your greenhouse, making sure you have a fairly high peak, especially if you live in an area that gets heavy rain or a lot of snow.
  5. A higher peak will make your greenhouse less susceptible to collapse.


To construct the ends, use a piece of PVC pipe to create the arch you want for the greenhouse.

  • Attach the pipe to a piece of 1x4, creating the first outline of the greenhouse.
  • Using a screw to attach the pipe will allow the pipe to naturally adjust and align.
  • If you’re working on the door end of the greenhouse, build the rest of the end frame around the door size you plan to use.
  • Three feet wide is fine, but you can choose a wider door if you want.
  • 1x4 lumber can be used to reinforce the frame, although 2x4s will offer a sturdier frame if you get a lot of snow.


Step #4 – Add Plastic to the Ends

After constructing well reinforced greenhouse ends, you’ll need to add plastic sheeting to the ends before constructing the rest of the greenhouse.
  • Greenhouse plastic is available, although you can use other types of plastic if you have it on hand.
  • Cut the plastic to fit your ends, stapling it to the front first.
  • After it’s stapled to the front, you can fold it over and then begin stapling to the frame on the back as well.
  • Any excess can easily be folded together.
  • Excess can be trimmed off and on the door end, you’ll want to cut out the door opening, but leave enough plastic to fold the plastic over to the door frame.


Step #5 – Place Ends and Reinforce with Steel Posts

Now you’re ready to place the ends of your greenhouse up on the greenhouse site. Tough steel fence posts help to reinforce the ends and keep them in place, which is especially handy if your area gests a lot of wind. Install fence posts, making sure they are plumb. Then, rope, wire ties or wire can be used to attach the end frames to your fence posts.


Step #6 – Add Intermediate Ribs and Secure

The next step is to begin adding the intermediate ribs to your greenhouse. It’s a good idea to have these ribs every three feet, or closer together if you need a stronger greenhouse. Before you begin adding them, use a piece of string to line up your stakes to add the ribs. Steep rebar pins can be used to help secure these ribs. Install the PVC pipe on the rebar pins to secure them. Tougher, larger pipe can be used as well if you’re worried about a stronger structure.


Step #7 – Reinforce the Top of the Frame

The ribs aren’t enough to keep the top of the frame reinforced, so you’ll want to reinforce it down each size with 1x2s or2x4s.
  • The ridge of the greenhouse needs to be reinforced as well.
  • This can easily be done with a length of PVC pipe.
  • This will help keep your greenhouse from sagging if you end up with heavy rain or snow on the greenhouse.
  • Screws and rope can be used along pipe intersections to keep them together.
  • The extra work and money for the ridge pole can keep your greenhouse from collapsing later. 
  • You can also add some 1x2s on the sides to offer further reinforcement to the overall structure.


Step #8 – Measure and Cut Plastic Covering

After you’re satisfied with the sturdiness of your frame, you’re ready to measure and cut your plastic greenhouse covering. Make sure that you cut out plastic that offers a bit extra in every direction. It’s better to cut it too big than too small. It’s important to know the dimensions of your greenhouse, before making the cut to ensure you cut your plastic in the right size.


Step #9 – Secure Plastic to 2x2s

On the ends, you’ll want to use 2x2x15’ boards in the center of the plastic, which will be used to help hold the plastic in place. Attach plastic to the boards and then roll the board at least one turn, then secure the plastic to the wood. This offers some weight to the bottom and offers a great way to make your connection secure


Step #10 – Position Plastic and Fasten to Greenhouse

You’re ready to position the plastic over the greenhouse frame.
  1. You’ll probably need a second pair of hands to help you get the plastic over the greenhouse. 
  2. Make sure the plastic is even on each side.
  3. Then, make sure you roll the edges under on the ends, securing them to the rest of the greenhouse frame.
  4. This can be done with staples or you can use screw battens, which may be a bit stronger and easier to take apart if you need to.

Conclusion:

To ensure you don’t have any gaps around the bottom, you can use some mulch or soil and rake it around the greenhouse.

  1. To keep out animals, add some stepping stones, blocks, rocks or bricks on top of the mulch or soil around the edges.
  2. To add some extra security for your plastic, you can also add some poly pipe clips, which keeps the wind from grabbing the plastic and ripping it off your greenhouse.

About the Author:

This article was written by Whitney Segura, founder of Mini Greenhouse Kits, follow him online on Twitter @GardeningFun.


He is a member of the following organizations, companies, associations, and special interest groups;
Southern Nursery and Landscaping Association: Member Since 2012
Hobby Greenhouse Association: Member Since 2011


Follow this Author:


Friday, December 13, 2013

Best Techniques and Equations for Calculating Greenhouse Heat Requirements

Calculating Your Greenhouse’s Heating Requirements

Both for novices and experienced greenhouse gardeners, there is one thing which is a perennial challenge – trying to determine exactly what size of heater is needed to keep a greenhouse at a desired temperature.


Obviously, there are a number of factors involved; the size of your greenhouse will make a difference. The kind of plants you’re growing is also an important consideration. Tomatoes, for instance, will thrive in warmer temperatures than say, lettuce.

One word of caution is in order before we go any further: it can be a bit on the expensive side to heat a greenhouse in the middle of winter, but it’s up to every gardener to decide for themselves what price they’re willing to pay for the pleasure of being able to pick tomatoes or watch tropical flowers bloom in January.


Before you begin to try to calculate how much heat you’ll need to generate, you should also go through your greenhouse carefully to seal any cracks which can allow heat to escape.


You may also want to use a few tricks to help retain heat in your greenhouse, such as large containers of rocks or water; these materials will absorb heat and then radiate it back into the environment, helping to keep your greenhouse a little warmer during the cold months.


The type of heater you use is up to you, but the following should help you begin figuring out your greenhouse’s heating requirements.

First, you’re going to need to take a few measurements. You may already have these figures handy, but if not, you’re going to need to head out to your greenhouse components, with a measuring tape and a stepladder.

You’ll need the following measurements:
  1. The length of your greenhouse (L).
  2. The width of your greenhouse (W).
  3. The height of your greenhouse, measured from the base of the greenhouse to the eaves (H).
  4. The height from the floor of your greenhouse to the highest point of your greenhouse’s roof (R).
  5. The length of the slope of your greenhouse’s roof (S).


Just as a note, these figures assume that your greenhouse is a single layer glass or plastic greenhouse whose glazing (or plastic sheeting) runs all the way down to the ground.

  • If the glass or plastic doesn't run all the way to ground level and you have brick or other solid materials covering the lower part of the structure, then take measurements of these parts of the greenhouse separately.
  • For further references, visit this plastic greenhouse manual by Cornell University Extension.
  • You’ll want to halve these measurements when you make your calculations to account for the lower heat loss of these materials.
  • If you have a double-layer greenhouse, whether the material is glass or plastic, then reduce the amount of heat you come up with by roughly 30%.


The figure you’ll arrive at aren't going to be accurate down to the millimeter, but it should be more than accurate enough to assess your greenhouse’s heating needs. This is the basic formula:

First, you’ll need to calculate the total surface area inside of your greenhouse. You can determine this by adding H and S, then multiplying by 2. Now, multiply this figure by L.


Next, add R and H, then multiply by W.

  • Add these two figures together to get the total surface area inside of your greenhouse.


If you’re more mathematically inclined, you can make this calculator slightly quicker using this formula: 


[2 x (H + S) x L] +

[(R+H) x W] = Inside Surface Area.

  1. The next step is to figure out the difference in temperature between the average winter low temperatures where you live and the minimum temperature you’d like to maintain inside your greenhouse.
  2. For instance, let’s say that you’re trying to grow tomatoes in your greenhouse. This means that you’ll want to maintain a temperature of at least 60 degrees.
  3. Now, let’s say that your average low temperature in winter is 32 degrees. This is a temperature differential of 28 degrees.


Now, multiply the temperature differential by the total inside surface area of your greenhouse and you’ll come up with a rough approximate of the number of BTUs you’ll need to keep your greenhouse at your desired minimum temperature.


If you’d rather have this figure in kilowatt hours (what your electric company uses to determine billing), you can divide the BTU figure by 3.413 to arrive at this number.
It’s as simple as that – which is to say, not exactly simple, but if you follow the directions here, you can find out how much heat you’ll need to provide for your greenhouse and a ballpark figure of what it will end up costing to keep your plants thriving in your greenhouse even in the middle of winter.


Tuesday, December 3, 2013

25 Tips for Year Round Gardening in Alabama USA


Alabama is a great state for raising a diverse range of plants and flowers.

Broken into five distinctive geological regions, you have your choice of planting in the high altitudes of the Talladega Mountains, or the Coastal Plain that covers a large part of the state. Alabama has been rated the fifth richest biological state in the union.

ACES Alabama Cooperative Extension System Picture

Climate also plays a big part for gardening in Alabama. The northern part of the state has soil similar to the Midwestern states, while the southern portion consists of marshy areas of the Gulf.


Here are 25 tips for year round gardening, regardless of where you live in this great state.


Northern Alabama Gardening Advice:

1. March is the time to set out Cabbage, Onions, Lettuce, Broccoli, and Brussel sprouts.
North Alabama Gardening Advice

2. Wait until November, before adding more rose bush plants, to your existing flower garden.
Growing a Flower Garden in North Alabama USA

3. Camellias, the state flower, grow nicely when planted under those feathery pine trees. The sunshine filters through nicely.
Year Round Gardening Tips for Alabama Gardeners

4. Attract butterflies, hummingbirds and Japanese beetles, to your garden, by planting Four o'clock flowers.
Pink and Red Rose Garden Shrubs Growing in Forest and Spanish Moss in Picture

5. The perfect flowering shrub for the Piedmont region is the Fothergilla. It loves acidic soil, delivers fragrance, and is very low maintenance.
Skyline Picture of Birmingham Alabama USA from Railroad Park

6. Half-hearty flowers, such as Ageratum, alyssum, Celosia, Phlox, Petunia,
Sunflower, Salpiglossis, Thunbergia, are good selections for the northern Piedmont region.

7. There are also tender annuals that do well in well-drained soil such as Godetia, Balsam, Nicotiana, Portulaca, Salvia, Zinnia, Phlox, Periwinkle, Nasturtium, Cockscomb, Begonia, Coleus, Marigold, and impatiens.
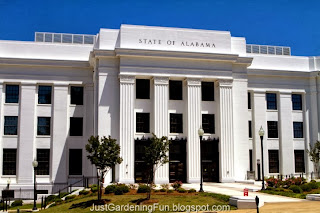
The Alabama States Attorney General Office Building Located in State Capitol Montgomery

8. Creeping violas do not have to be a bad thing. The intoxicating scent can create a haven for your garden. However, you can control the spread with a border of wood chips.
Water Garden Huntsville Alabama USA Botanical Gardens Picture
9. Join the MGNA (Master Gardeners of North Alabama), a voluntary group dedicated to bringing education to those interested in the field of horticulture.
Alabama Master Gardener Association AMGA Logo

Southern Alabama Gardening Tips:

10. Tomatoes and peppers will thrive when set out in March.

11. July is the best time to put those turnips, rutabagas, beans, and peas, in the ground.

12. No green thumb needed for bringing the Louisiana Iris to life, when faced with marshy conditions. They love the natural water found along the American Gulf Coast.

13. Plant bald Cyprus as a lovely backyard landscaping tool for a shaded summer time area and a spectacular hint of sunshine, in the winter, with soft, feathery foliage.
How to Grow Hardy Annuals in Alabama USA

14. Select hardy annuals, such as California poppy, Snapdragon, Calendula, Coreopsis, Candytuft, Gaillardia, Gypsophila, larkspur, poppies, stocks, sweet peas, verbena, dianthus, and pansies to add color to your yard.

15. Fruits and nuts, such as Pecans, Peaches, Pears, apples, plums, apricots, blueberries, raspberries, Gooseberries, blackberries, hickory, walnuts, Dewberries, and strawberries, enjoy the moist, hot climate of southern Alabama.


Great Tips for all Alabama Gardening

16. Use red wigglers to make the best vermicompost in Alabama. Use kitchen scraps to feed these hungry friends that can consume half their weight in food each day.
Welcome to Montgomery in the Beautiful State of Alabama Sign

17. Fire ants dislike biodiversity and healthy compost fits this bill, nicely. Spread around the edges of your garden to stop fire ants cold. A little molasses, on top, can further detain.
Gorgeous Southern_Red Bridge Over Pond in Huntsville Alabama

18. Move your veggies around each year. When their desired spot is found, you will recognize the difference.
How to Grow Flowers in Alabama

19. Avoid fighting Mother Nature. Instead, go with the flow of natural developed wildflowers in your distinct Alabama area.
Natural Developed Wildflowers in Northern Alabama
20. Keep that leftover breakfast coffee and use as a deterrent against slugs and other garden intruders. While caffeine may be a stimulant to humans, it is deadly to creeping predators.

Tips for Growing Plants in Northern Alabama USA
21. Add a backdrop of beauty to your vegetable garden by planting deer-resistant plants, such as Caryopteris, Epdimedium, Goldenrod, and Rosemary.
Growing Vegetables in Alabama for Beginners

22. When the pine needles begin to die and pile around your trees, rake them up and use as mulch.

Pine Needles in Alabama
23. Never freak when you see those tiny green snakes. They are around to clean up the insects that prey on your veggies.
Flower Blubs and Plant Bushes in Alabama Gardens

24. Get your flower bulbs, plants and bushes, planted in December and January. They will have a head start in the spring.
White Flowers Blossoming in Alabamas Botanical Garden

25. There's a new bug in town, the Megacopta cribraria, or the kudzu bug, is becoming a pest, much like the Asian lady bug. If you see an infestation on your beans, or your house, call your County Extension office for help.
Antique Map Mississippi Alabama Louisiana Tennessee Kentucky USA


The charming hills, mountains, flat lands, and marshes, can become a haven for many varieties of plants, flowers and food. The climate is especially pleasing for staying active in year round gardening.


What Was the Reason, You Started & Get Into Gardening?